How to Draw a Elegant Design
Read Time: 9 mins Languages:

This tutorial shows you how to draw a detailed and elegant bird with a pencil and color pencils. It may look complicated at first, however it's based on simple shapes with further refinement. With just bit of patience, you can do it yourself. Pencils to the ready... let's go!
Tools


- Mechanical Pencil
- Faber Castell Classic Color Pencils No: 309, 314, 341, 343, 349, 357, 361, 362, 367, 370
- Eraser
- Paper type: Double A
Although I am using Faber Castell color pencils, you can use your own branded pencils. I've mentioned the colors I'll be using through out the coloring portion of this tutorial.
1. Draw the Bird
Step 1
Draw two ellipses for its head and body. One side of the small ellipses is tapered, egg shaped, because we will draw his beak on that side. The space from the small circle and the big circle isn't too far or too short. It's better be around a quarter of the big ellipse.
The sketching stage should always be drawn with light lines to make it easier to remove, so avoid pressing too firmly on the pencil.


Step 2
Draw basic lines for the beak, three lines for the neck (the middle line will be used as detail later). Sketch out other lines for wings. Try to let your lines flow, try to avoid stiff lines as these are to be flowing, elegant looking wings. Smooth curves will work very well here.


Step 3
Draw three lines for the bird's crest (feathers on the head). Try to have they curves to make they look more "real". Draw curve lines for the tail feathers too. You can have the tail's length as you want but because we are drawing fantasy bird, the longer tail will be the nicer it is.
Add smaller details and curves by drawing the eye and nose. Drawing other curve lines to close the wing shapes.


Step 4
Add basic curved triangles for the bottoms of the tail feathers.


Step 5
Start to add little details for the head feather, wings and main tail. For the wings, draw the bottom row of feathers using your sketched lines as a guide. Try to draw the tail with curved small lines so it will create the look of delicate feathers.


Step 6
Draw another row/layer of feather just same as what you did before for the wings. Draw another layer of pencil on the head, beak, and a bit of the stomach. These will be thicker and more confident lines.


Step 7
Add the lines towards the end of the wings. Please make sure the ending feather is pointed and has a bit of curve. This will add to it's elegance.


Step 8
Start to working on the chest of the bird by giving random curve lines to give the impression of feathers.


Step 9
Work on another layer of feathers for the wings, to help build them up. Try and match the same style for both wings so it looks balanced.


Step 10
Finish the end of wing with pointed feather like you did on the left wing. Don't be afraid to erase any sketch lines you no longer require.


Step 11
Now let's begin adding further detailing to the body of the bird. I've added further curved lines to the side of the stomach.


Step 12
Add four curved triangles as you did at the tail, but this time for stomach. As we mention above, don't press the pencil so hard. This time, the stomach needs to be lightly drawn, otherwise it will lose it's soft feather look.


Step 13
I've added small lines at the ends of the triangles on the stomach. This will create a delicate look to them.


Step 14
Draw details between two lines on the neck. Make them look like scales as apposed to feathers. Also, add more details on all the triangle feathers.
I'm going to add further detailing to the eyes, including a pupil. Our bird is beginning to come to life!


Step 15
I'm going to add curves and swirls to the detailing of the wings. This will add to the elegant style. We're aiming for a fantasy bird, so these additions are part of our artistic license. As long as the core structure of the bird is drawn realistically, the detailing can be as elaborate as you wish.


Step 16
Touch up more of the details of the left wing.


Step 17
The left wing still feel a bit of empty, so we should add one more little detail in the empty space. On the right wing, we add three more feathers. You can imagine you are drawing leaves on the tips of these. This is the shape we're aiming for here.
Add details on the neck and add more shadow to the eye to make it stronger.


Step 18
Add more feathers to the stomach.


Step 19
Add more lines to make the stomach look more full of feathers. Start to draw a few long lines down from stomach


Step 20
Add details to the right wing.
We will start working on the tail now. Add some soft curved lines to give the appearance the long feathers are moving in the wind.


Step 21
Draw extra feathers to the opening of the right wing. It will help create a less stiff shape. Remember we want our bird to be elegant and flowing in the wind, so loose curves are the direction we're wanting to go in.


Step 22
Create further lines and curves to push the elegant stance of the bird. This will also help balance the composition.


Step 22
Repeat step above for left wing. With these extra feathers, draw them smaller compared to other wing because this wing is slightly closed.


Step 23
Let's finish of the pencil line work of the bird. Add more extra feathers to the tail. I also add a big triangle feather at the end of feather.


2. Add Color Using Colored Pencils
Step 1
For the base color, I'll be using No: 349 (blue).
I start to add the base color on the bird. Put the colors in all areas which we will know they will be shadow. For example, under the feathers.
Press the color pencil lightly. If you want the color to look darker, just layer the color again. Applying pressure to the pencil will distort the color, texture and will work against the soft, fantasy look we're aiming for.


Step 2
Still use color pencil No: 349 (blue) to color the few areas which you want to stand out, for example the triangle feathers in the tail.


Step 3
Add this color to a few feather on the left wing and triangle feathers. You can see several parts have stronger colors because I put more layers of the same color blue on them.


Step 4
Now with color pencil No: 357 (peacock green). Start to color the whole left wing with a light layer.


Step 5
Switch back to color pencil No: 349 (blue) and start to color the right wing.


Step 6
With color pencil No: 343 (royal blue), use this color to add highlights to a few parts. While I'm using colors of similar shades, it will make a difference later on as the colors will blend better together.


Step 7
With color pencil No: 362 (emerald), add this color into the empty space of the right wing


Step 8
With color pencil No: 361 (mint green-blue) use this pencil to add a shadowed area on the right wing.


Step 9
Still using color pencil No: 361 (mint green-blue), add this color to the chest and neck.


Step 10
Then add shadow to the tail and the feather on the head with the same pencil.


Step 11
Back to using color pencil No: 362 (emerald), add this base color to the extra feathers of right wing.


Step 12
Then back again to color pencil No: 361 (mint green-blue), add highlight for the triangle feathers and other feathers.


Step 13
Let's add another color, No: 341 (violet purple) to add color to the neck, chest and a little on stomach.


Step 14
Still with No: 341 (violet purple), continue to add this color on the right wing and the additional feathers on it. Touch up a bit on the stomach to make the purple a little more present.


Step 15
Let's add a darker green to this with color pencil No: 367 (forest green). Use this color with the other white areas, but not all. Keep some smaller areas to touch up later like on, for example the top of the wing, details circles, etc...


Step 16
Let's start to use a more yellow tone with color pencil No: 309 (golden yellow). Use this color for the top edge of right wing, neck, head and beak.


Step 17
Now to introduce a color between the yellow and green tones, color pencil No: 370 (lime green). Add this color to the rest of white space on the right wing.


Step 18
Back to the yellow, use color pencil No: 309 (golden yellow) to blend slightly on left wing.


Step 19
Then back to color pencil No: 370 (lime green) to fill the white space and blend the chest and neck.


Step 20
Using color pencil No: 361 (mint green-blue), fill the stomach area with a layer of this color. The triangle feathers should have more than one layer of this color to help them stand out.


Step 21
Using color pencil No: 370 (lime green), add plenty of layers of this color to a few parts on stomach to highlight it.


Step 22
With color pencil No: 370 (lime green), use this to highlight the tail.


Step 23
Then with color pencil No: 361 (mint green-blue), fill all details with this color. Don't forget to leave fill spots of white to highlight the raised areas.


Step 24
Let's add some contrast with the darker purple, color pencil No: 341 (violet purple). Add contrast to stomach, wing top edge and tail.


Step 25
Back to the yellow, color pencil No: 309 (golden yellow). Blend this color at the tail and the extra feathers of the wings


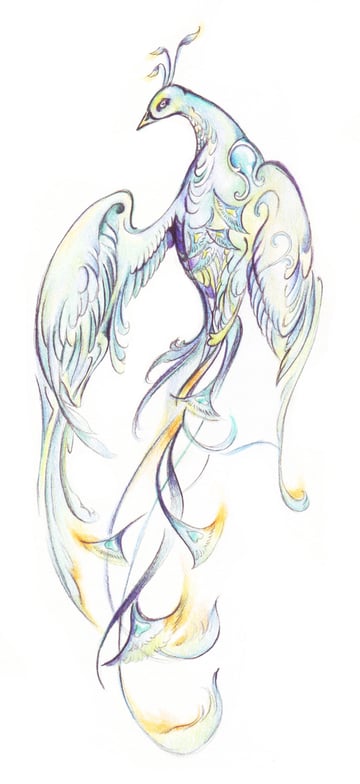
Step 26
Finally, using color pencil No: 314 (citrus orange), add this at the tail to create a flame like look to the tips of the feathers.
Wow, She Looks Beautiful. Well Done!
I hope you've enjoyed this tutorial on drawing an elegant, fantasy bird and picked up some tips on how to create your own. Working with colored pencils is just a matter of learning to blend the colors well, building up the layers of color rather than forcing color by adding pressure. Have fun with your new creation!

Hellobaby is an artist with a passion for drawing with traditional tools, such as colored pencils and water colors.
Source: https://design.tutsplus.com/articles/how-to-draw-an-elegant-fantasy-bird-with-colored-pencils--vector-15416

0 Response to "How to Draw a Elegant Design"
Post a Comment